Wednesday, November 22, 2006

Funny EA Sports NHL 2007 Bug

I came across a bug that I reported to EA but wanted to share since I haven't come across anyone else that has encountered it before.

The basic gist of the bug is that there is an extra goalie on one of the teams. Moreover, the team that has the extra goalie seems to steal this man from the other team because they are one man shy. So not only does one team have an extra goalie, the extra man was taken from the other team!

Oddly, enough, I really like this bug. It's really fun trying to deke out both goalies. Right when you think that you have beat one of them, the other dives across and saves the day. Who knows, maybe EA should add a mini-game in the next installment that allows you to play against a team with an extra on ice goalie.

So how does one re-create this bug?
  • First of all, I have an Xbox 360, so that is the only platform that I have tried this game on. So all other consoles are out of luck.

  • Second, the bug has happened to me many times, and only when playing against a friend using the 'play now' mode. The team that always seems to be on the ice when this happens are the Buffalo Sabres. For the screenshots below, they were playing against Colorado.

  • Thirdly, you have to edit your lines once you have chosen your teams and before loading the game. When changing your lines, try to have as many players listed as 'undefined, undefined, undefined'. If you don't know what I mean, try double shifting players repeatedly until this glitch occurs.

  • Finally, go on and play the game. During a face off, you will notice that all of a sudden both teams are 4 on 4. After the face off, a player will come off the bench and his team will have an extra goalie.
So below are some screen shots that I took when I encountered the bug. Sorry if they are out of focus, but I am sure that you get the point!


Thursday, November 09, 2006

Intel ProSet Wireless Issues and Solutions

I decided today that I would update the drivers for my Intel Pro/Wireless 2915ABG Network Card. This is the network card that came with my Dell Inspiron 6000.

Downloading the file from Dell's website was no problem at all. The only thing that bothers me is that the file is 100MB. A bit large for something that just handles wireless connections don't you think?

Anyways, in the past all attempts of upgrading my drivers have led to failure. For one reason or another, the upgrade doesn't work and I revert to old drivers. I always wonder what it is that I am missing ...

Back to the story ... I downloaded the drivers and installed them. I wasn't surprised when I was unable to connect to my network. Another upgrade, and another failure... Wait, not this time. I was determined to see it through.

To save you from my ramblings, this is what I found:
  1. My Intel wireless card does not like my wireless router.
  2. To get my router and the wireless card talking, I had to downgrade router. Actually, I went from a purely G router, to a mixed mode B/G setting.
  3. My wireless card likes to beep when it connects to a network
Okay, so point 2 solved my incompatiblity issue. That's great, except I wish that I didn't have to run in mixed mode. To make sure that my wireless card isn't running in B mode, I made sure that the adapters 'Wireless Mode' was set to '802.11g only'. You can modify this setting from the 'Advanced' tab of the wireless card's properties panel (Control + A from within the Intel ProSet/Wireless application window).


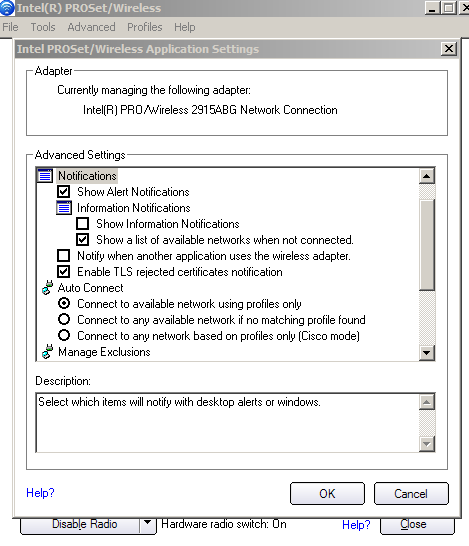
As for point 3 above, the beeping, I think that I managed to fix that by modifying a setting in the Intel PROSet/Wireless Application Settings (issue a Control + P from within the application) window. The setting that I changed was to uncheck the 'Show Information Notifications' box. This seemed to work for me.


All in all, I am glad that I finally was able to upgrade my drivers. Hope that you can too.

Monday, October 30, 2006

Scheduling an Ongoing Task in a Servlet

Recently, I had the need to create a task that had to run hourly, with the stats to be available to clients. I wanted the task to be distributed without having to worry about configuring a database store, etc.


The solution I came up with was to create a JAVA servlet and use a Timer object to schedule a timer task that runs every hour. The task then runs hourly and saves the results in memory.


Usually, creating threads (which is what a TimerTask object is) in a servlet container is frowned upon because the container cannot manage the resources used by the user spawned thread. In addition, whenever your web application is deployed, reloaded, or undeployed you have to ensure that you clean up after your thread.


The first thing that you will do is implement the ServletContextListener interface. This interface consist of 2 methods that you will have to implement, namely,


public void contextInitialized (ServletContextEvent servletContextEvent);

&

public void contextDestroyed (ServletContextEvent servletContextEvent);


The contextInitialized(...) method is invoked by the servlet container everytime the servlet is 'started up'. So upon initial deployment, this method is called. Everytime you reload your web application, this method is invoked.

The contextDestroyed(...) method is invoked everytime the web application is shut down, for example, when you reload or un-deploy the web application.

Ideally, anything that you need to do when the web application first starts up should be done in the contextInitialized(...) method, while anything to undo the initialization should be done in the contextDestroyed(...) method.


In the contextInitialized(...) method, the idea is to create a TimerTask object and using the Timer object, schedule it at the desired time interval. Once the scheduling is done, we save the Timer object as an attribute in the ServletContext.

For example, assuming that MyTimerTask extends TimerTask,

  
ServletContext servletContext = servletContextEvent.getServletContext();
try{
// create the timer and timer task objects
Timer timer = new Timer();
MyTimerTask task = new MyTimerTask();

// get a calendar to initialize the start time
Calendar calendar = Calendar.getInstance();
Date startTime = calendar.getTime();

// schedule the task to run hourly
timer.scheduleAtFixedRate(task, startTime, 1000 * 60 * 60);

// save our timer for later use
servletContext.setAttribute ("timer", timer);
} catch (Exception e) {
servletContext.log ("Problem initializing the task that was to run hourly: " + e.getMessage ());
}

In the contextDestroyed(...) method, the idea is to clean up after yourself. In our case, this means cancelling any tasks and removing the timer object.


ServletContext servletContext = servletContextEvent.getServletContext();

// get our timer from the Context
Timer timer = (Timer)servletContext.getAttribute ("timer");

// cancel all pending tasks in the timers queue
if (timer != null)
timer.cancel();

// remove the timer from the servlet context
servletContext.removeAttribute ("timer");

The final thing that we have to do now is make sure that our ServletContextListener is added to our web.xml file.

As a child element of the <web-app> element, add the following lines of code:


<listener>
<listener-class>your.package.declaration.MyServletContextListener</listener-class>
</listener>

Where, your.package.declaration is the package containing the class MyServletContextListener that implements ServletContextListener!

Now everytime the web application starts up and shuts down, our listener will be invoked. Not only did we create an on-going task, but we scheduled the task and made sure that we cleaned up after ourselves too!