As someone that enjoys shopping for things online, I thought that I would share a way for Canadian shoppers to earn rebates while shopping for items online.
Great Canadian Rebates is a site that lists various online retailers and offers coupons/rebates (ranging from a flat amount of cash back, to 12%) on items that you buy from retailers that they list. The require you to sign up for an account and then to click through their site to shop the online retailer. With my account, I have received just under $70 back in under a year. They even give you a toonie ($2) for just signing up!
I figure that since I buy stuff online, why not get a little something back!
Thursday, November 26, 2009
Wednesday, November 25, 2009
Perl script to exact packages from multi package Perl module
Here is a little script that I use to extract the individual modules from a multiple package Perl module.
While the script works, it isn't perfect and if you have any comments, have an addendum, etc, please let me know!
The script is below. Please make sure to edit $file, the input file, and $outdir, the destination directory. Good Luck.
While the script works, it isn't perfect and if you have any comments, have an addendum, etc, please let me know!
The script is below. Please make sure to edit $file, the input file, and $outdir, the destination directory. Good Luck.
#!/usr/bin/perl -w
use strict;
use File::Spec;
use File::Path qw(mkpath);
my $file   = '/exact/path/to/perl/module.pm';
my $outdir = '/tmp/';
open(my $fh, '<', "$file") or die $!;
my $contents = '';
my $filename = undef;
while (<$fh>) {
       if ( $_ =~ /^package (.*);/g ) {

               # construct a new file
               $contents = '';

               # its filename
               $filename = File::Spec->catfile( $outdir, split( /::/, $1 ) ) . '.pm';

               # its contents
               $contents .= $_;
       } elsif ( $_ =~ /^1;/g ) {

               # put the contents into $filename
               $contents .= $_;
               my ( $volume, $directories, $file ) = File::Spec->splitpath($filename);

               # make the path
               mkpath(
                                  $directories,
                                  {
                                         verbose => 1,
                                         mode    => 0711,
                                  }
               );
               do {
                       open OUT, ">$filename" or die "Can't write to $filename: $!\n";
                       print OUT $contents;
                       close OUT;
               } if $filename;
       } else {
               $contents .= $_;
       }
}
close $fh;
Monday, October 12, 2009
Callback Functions - Scoping
According to Wikipedia, a callback function is executable code that is passed as an argument to other code. It allows a lower-level software layer to call a subroutine (or function) defined in a higher-level layer.
Callback functions are used very frequently in event driven software systems. Whenever an event happens, a function is called.
The idea is simple, but many people tend to become confused when using these things. The problem that they encounter is that people tend to run into problems with the scope of variables that they are using.
Part of the problem is remembering that the callback function may form a closure. When the callback function is executed, the scope consists of the callback function's code and references to any variables of the function containing the callback function reference. The converse is not true; the function containing the callback function reference cannot use the arguments and variables of the callback function.
Another thing that can confuse people using callback functions is the use of global variables. Since callbacks are usually called in response to events, it may not be clear what the current state of the system is and using any predefined global variable may result in inconsistent results.
In addition to global variables, variables using the same name in the code containing the reference to the callback function and with in the callback can sometimes confusing to people. In this case, the variable within the callback takes precedence.
# example function with closure

function makePowerTo(x) {
 return function(y) {
  var result = y;
  for (var i = 1; i < x;i++)
    result *= y;
  return result;
  };
}
var square = makePowerTo(2);
var cube = makePowerTo(3);
print(square(2)); // 4
print(cube(2));   // 8
squarecube are both closures. They share the same function body definition, but store different environments. In square's environment, x is 2. As far as cube is concerned, x is 3.
Monday, October 05, 2009
Finding and Deleting Files
Today, I was trying to remove a bunch of temporary files using the DOS command prompt on Windows Vista. What a pain in the butt!
Let's assume that I have a bunch of unwanted ".tmp" files in the sub-directory "subdir". The directory "subdir" also has other sub-directories containing more files that I would like to delete.
For those of you familiar with Linux, to find and delete files its as easy as the following command:
To make a long story short, I was finally able to come up with the following:
Let's assume that I have a bunch of unwanted ".tmp" files in the sub-directory "subdir". The directory "subdir" also has other sub-directories containing more files that I would like to delete.
For those of you familiar with Linux, to find and delete files its as easy as the following command:
find ./subdir/ -name '*.tmp'-exec rm -f {} \;Unfortunately, I couldn't muster something like that up on Windows Vista. I tried stuff likedir /B /S | find ".tmp"This produced the full path of the files that I no longer wanted. When I then tried to pipe those files to del, like
dir /B /S | find ".tmp" | delVista just said 'The syntax of the command is incorrect.'
To make a long story short, I was finally able to come up with the following:
for /R %i in ("*.tmp") do del %iDo you have an alternative way of finding and deleting files?
Thursday, October 01, 2009
Trim whitespace from string in PERL
I like Java's String.trim() method, and so I thought I would add one for PERL:
That is all that there is to it!
You can add this to your module, and do $self->trim($string) or you can do trim($string) ... If you have anything to add, let me know!
sub trim {
     my ($self, $text) = @_;
     $text = $self
           if ref(\$self) =~ m/^SCALAR/i;
     # return empty string if $text is not defined
     return "" unless $text;
     $text =~ s/^\s+//;
     $text =~ s/\s+$//;
     return $text;
}
That is all that there is to it!
You can add this to your module, and do $self->trim($string) or you can do trim($string) ... If you have anything to add, let me know!
Monday, August 31, 2009
Eclipse.ini / Windows Vista - Don't hardcode Vm; Use JAVA_HOME
I have a little trick for those of you using Windows Vista (and possibly XP), running Eclipse and fed up of editing your eclipse.ini file each and every time you upgrade your JAVA installation! You know what I mean!
According to Eclipsepedia, you need to tell Eclipse the exact path to your JAVA executable. You cannot use JAVA_HOME or any other variable name in this file!
Here we are going to show you how to make Eclipse use your JAVA_HOME directory so that when new versions (one of the umpteen updates) of JAVA are installed, Eclipse just works!
Assumptions:
The next step is to enter the following command at the prompt:

For those of you curious to see what happens when I list the directory contents:

The final step is now to put our symbolic link in the eclipse.ini file. So open up the eclipse.ini file (you can create a backup first if you like) and look for the lines that look like:
and replace them with:
Remember, that you are editing 2 lines (the -vm is on one line, while the java\bin\javaw.exe is on another)!
To confirm that everything works as promised, save your eclipse.ini file and start up eclipse!
According to Eclipsepedia, you need to tell Eclipse the exact path to your JAVA executable. You cannot use JAVA_HOME or any other variable name in this file!
Here we are going to show you how to make Eclipse use your JAVA_HOME directory so that when new versions (one of the umpteen updates) of JAVA are installed, Eclipse just works!
Assumptions:
- You are using Windows Vista (or possible XP).
- You know the exact path to your Eclipse installation directory.
- You know the exact path of the JVM that your eclipse installation is utilizing.
- The variable JAVA_HOME is set up on your computer.
The next step is to enter the following command at the prompt:
mklink /D java %JAVA_HOME%
Basically, we are telling Windows to create a symbolic link from the eclipse home directory, to the JAVA_HOME directory and to call this link java. Windows uses a program called mklink to do this.The output from that command will should resemble something like:

For those of you curious to see what happens when I list the directory contents:

The final step is now to put our symbolic link in the eclipse.ini file. So open up the eclipse.ini file (you can create a backup first if you like) and look for the lines that look like:
-vm
C:\path\to\JAVA_SDK\bin\javaw.exe
C:\path\to\JAVA_SDK\bin\javaw.exe
and replace them with:
-vm
java\bin\javaw.exe
java\bin\javaw.exe
Remember, that you are editing 2 lines (the -vm is on one line, while the java\bin\javaw.exe is on another)!
To confirm that everything works as promised, save your eclipse.ini file and start up eclipse!
Wednesday, May 27, 2009
Eclipse, Maven & Jetty
How to run your web application Maven archetype with Jetty in Eclipse
We will be creating 2 'External Tool Configurations', one to start our web application and one to stop it.
To get started, we need need to bring up the Create, manage, and run configurations window. This can be done by clicking on
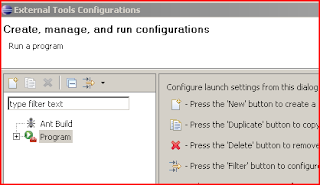
From here, we will context click on Program and choose to create a new configuration. Do this twice and give them the names mvn jetty run and mvn jetty stop.

Now we have to configure our new External Tool!
The configuration for both start and stop are very similar! The only difference is for the Arguments section.
Under Location, we need to enter the absolute path to our maven executable. On windows, this is mvn.bat and can be found in the \maven\bin\ directory. On *nix machines, you are looking for mvn.
For Working Directory, we enter ${project_loc}.
Finally, for Arguments, we enter clean jetty:run for our mvn jetty run configuration and jetty:stop for our mvn jetty stop configuration.

The next thing to configure is the Environment. Here we will set up MAVEN_OPTS so that we can remotely debug our application if the need ever arises! This is only done for the mvn jetty run configuration!
Basically, click on New... and give the variable the name MAVEN_OPTS with the value (all on one line):
-Xdebug -Xnoagent -Djava.compiler=NONE -Xrunjdwp:transport=dt_socket,address=4000,server=y,suspend=n

When we are done, it should look like so:
 We are pretty much done. I like to have my configuration handy, so I usually add these external configurations to the favorites menu. This is done from the Common tab. Basically, you just add a check to the check box in the Display in favorites menu.
For the run configuration:
 And finally, for the stop configuration:

That really is all there is to it. The only other thing to make sure of is that you have the maven-jetty-plugin added to your POM file.
Here is the plugin XML fragment that I have currently:
Let me know if you have any questions!
We will be creating 2 'External Tool Configurations', one to start our web application and one to stop it.
To get started, we need need to bring up the Create, manage, and run configurations window. This can be done by clicking on
Run -> External Tools -> External Tools Configurations...
from the menu bar.

From here, we will context click on Program and choose to create a new configuration. Do this twice and give them the names mvn jetty run and mvn jetty stop.

Now we have to configure our new External Tool!
The configuration for both start and stop are very similar! The only difference is for the Arguments section.
Under Location, we need to enter the absolute path to our maven executable. On windows, this is mvn.bat and can be found in the \maven\bin\ directory. On *nix machines, you are looking for mvn.
For Working Directory, we enter ${project_loc}.
Finally, for Arguments, we enter clean jetty:run for our mvn jetty run configuration and jetty:stop for our mvn jetty stop configuration.

The next thing to configure is the Environment. Here we will set up MAVEN_OPTS so that we can remotely debug our application if the need ever arises! This is only done for the mvn jetty run configuration!
Basically, click on New... and give the variable the name MAVEN_OPTS with the value (all on one line):
-Xdebug -Xnoagent -Djava.compiler=NONE -Xrunjdwp:transport=dt_socket,address=4000,server=y,suspend=n

When we are done, it should look like so:
 We are pretty much done. I like to have my configuration handy, so I usually add these external configurations to the favorites menu. This is done from the Common tab. Basically, you just add a check to the check box in the Display in favorites menu.
For the run configuration:
 And finally, for the stop configuration:
That really is all there is to it. The only other thing to make sure of is that you have the maven-jetty-plugin added to your POM file.
Here is the plugin XML fragment that I have currently:
    <plugin>
       <groupId>org.mortbay.jetty</groupId>
       <artifactId>maven-jetty-plugin</artifactId>
       <version>6.1.16</version>
       <configuration>
           <stopPort>9966</stopPort>
           <stopKey>foo</stopKey>
       </configuration>
   </plugin>
Let me know if you have any questions!
Wednesday, April 29, 2009
Google App Engine & Eclipse
I am going to show you how to run your Google App (Python) in eclipse without any special plugins!
All you need to do is ensure that you have downloaded and installed both the Google App Engine and Python.
The trick to getting Google apps to run within eclipse is to run your app as an 'External Tool'.
From the Eclipse file menu, click on
In the resulting window, choose to create a new program:

Give it a name (I called it 'App Engine') in the Name field. In the Location field, enter the exact path to your Python executable. For the Working Directory, enter the exact path to the Google App Engine.
The Arguments field is the most interesting one! Here we enter:
The dev_appserver.py is the Python script that Google tells you to run when you want to test your app.
The -d just tells the App Engine to output debug statements. Feel free to use any command line arguments that the App Engine allows!
Finally, the ${resource_loc} tells Eclipse to use the full path of any item currently selected in the Navigator.

The final thing to do is to click on the Common tab and to Select "Display in favorites menu". This will provide you with a shortcut so that running your Google App requires the least amount of clicks!

Set up is complete!
Now choose the root folder of your Google App in Eclipse and click on 'App Engine' (or the name that you named your External Tool).

As you can see, the App Engine is running!

Some Notes:
All you need to do is ensure that you have downloaded and installed both the Google App Engine and Python.
The trick to getting Google apps to run within eclipse is to run your app as an 'External Tool'.
From the Eclipse file menu, click on
Run -> External Tools -> External Tools Configuration ...
In the resulting window, choose to create a new program:

Give it a name (I called it 'App Engine') in the Name field. In the Location field, enter the exact path to your Python executable. For the Working Directory, enter the exact path to the Google App Engine.
The Arguments field is the most interesting one! Here we enter:
dev_appserver.py -d ${resource_loc}
The dev_appserver.py is the Python script that Google tells you to run when you want to test your app.
The -d just tells the App Engine to output debug statements. Feel free to use any command line arguments that the App Engine allows!
Finally, the ${resource_loc} tells Eclipse to use the full path of any item currently selected in the Navigator.

The final thing to do is to click on the Common tab and to Select "Display in favorites menu". This will provide you with a shortcut so that running your Google App requires the least amount of clicks!

Set up is complete!
Now choose the root folder of your Google App in Eclipse and click on 'App Engine' (or the name that you named your External Tool).

As you can see, the App Engine is running!

Some Notes:
- If the App engine looks like it has hung (froze), click in the Eclipse console and hit the return key on your keyboard. What may have happened is that the App Engine has prompted you to check for updates and Eclipse didn't show you the message.
- If you get an Eclipse error, "Problem Occurred", make sure that the root folder for your app is selected in Eclipse (i.e. click on it!).
Monday, April 27, 2009
for loop using 'find'
I find myself constantly creating complex loops and forgetting, for a small instance of time, how to construct them again.
In this case, I wanted to list files that passed a certain criteria and loop over them so that I could call a Perl script on them.
For example:
Of course, you don't have run a perl script ... you could just echo the output:
In this case, I wanted to list files that passed a certain criteria and loop over them so that I could call a Perl script on them.
For example:
for i in `find . -type f -name '*.pm' -print`; \In the above case, I am searching for all files that end in pm, starting from the current directory (.) and once found, I am executing the perl script some_script.pl on them.
do perl some_script.pl $i; \
done
Of course, you don't have run a perl script ... you could just echo the output:
for i in `find . -type f -name '*.pm' -print`; \Now, next time I need to run a similar command, I wont forget how to construct the query!
do echo found $i; \
done
Thursday, January 08, 2009
Skipping Maven Tests ... For real!
For the longest time, I have been trying to figure out how to skip running
the tests that are in a project that I have been working on because they
usually fail!
the tests that are in a project that I have been working on because they
usually fail!
Usually, I edit the POM file and disable testing, but with a project
containing numerous subprojects, this became very tedious.
All of the documentation points to a variable maven.test.skip and states to
set it to true in order to skip tests; something like:
maven.test.skip=true
This has never worked for me. In case you are wondering, I am using maven
2.0.9 (latest as of January 8, 2009)
Having tried everything, I finally have found a way to get it to work
properly:
maven.test.skip.exec=true
Now when I run the install task for the project, I do it like:
mvn -Dmaven.test.skip.exec=true install
Tests are finally skipped!
Subscribe to:
Posts (Atom)
