How to run your web application Maven archetype with Jetty in EclipseWe will be creating 2 '
External Tool Configurations', one to start our web application and one to stop it.
To get started, we need need to bring up the
Create, manage, and run configurations window. This can be done by clicking on
Run -> External Tools -> External Tools Configurations...from the menu bar.
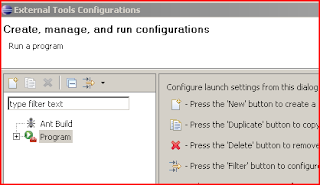
From here, we will context click on Program and choose to create a new configuration. Do this twice and give them the names
mvn jetty run and
mvn jetty stop.

Now we have to configure our new External Tool!
The configuration for both
start and
stop are very similar! The only difference is for the
Arguments section.
Under
Location, we need to enter the absolute path to our maven executable. On windows, this is
mvn.bat and can be found in the
\maven\bin\ directory. On *nix machines, you are looking for
mvn.
For
Working Directory, we enter
${project_loc}.
Finally, for
Arguments, we enter
clean jetty:run for our
mvn jetty run configuration and
jetty:stop for our
mvn jetty stop configuration.

The next thing to configure is the
Environment. Here we will set up
MAVEN_OPTS so that we can remotely debug our application if the need ever arises!
This is only done for the mvn jetty run configuration!Basically, click on New... and give the variable the
name MAVEN_OPTS with the
value (all on one line):
-Xdebug -Xnoagent -Djava.compiler=NONE -Xrunjdwp:transport=dt_socket,address=4000,server=y,suspend=n
When we are done, it should look like so:

We are pretty much done. I like to have my configuration handy, so I usually add these external configurations to the favorites menu. This is done from the
Common tab. Basically, you just add a check to the check box in the
Display in favorites menu.
For the run configuration:

And finally, for the stop configuration:

That really is all there is to it. The only other thing to make sure of is that you have the
maven-jetty-plugin added to your
POM file.
Here is the plugin XML fragment that I have currently:
    <plugin>
       <groupId>org.mortbay.jetty</groupId>
       <artifactId>maven-jetty-plugin</artifactId>
       <version>6.1.16</version>
       <configuration>
           <stopPort>9966</stopPort>
           <stopKey>foo</stopKey>
       </configuration>
   </plugin>
Let me know if you have any questions!


